

Repotting a plant may seem like a messy job, and more often than not, it really can be. Still, it is a necessary thing to do if you want your green friends to be healthy and have optimal growth. If you want to make the process as quick as possible and learn how to repot a plant in a mess-free way, this is the place for you.
I’ll provide you with some cool tips on how to repot plants. So, how to repot plants? These are 13 steps that you should keep in mind when repotting:
- Water the plant
- Prepare your new planter to repot a plant
- Place the coffee filter or paper towel on the drainage holes
- Add fresh soil to the new container
- Take the plant out super gently
- Take care of the roots
- Place the plant into its new home
- Add the rest of the soil
- Press the soil to eliminate air pockets
- Add a bit of fertilizer (if needed)
- Water thoroughly after repotting
- Let it drain
- Find a place for the freshly repotted plant
These are the steps, but there are lots of things you should also know before repotting plants. So first of all, let’s answer the main question many of you ask:
Why Should I Repot My Plants in the First Place?
You might ask yourself: ”How do i know if my plant needs to be repotted?”
While some of the plants prefer cramped containers, the majority will thrive when given enough room for the roots to grow.
So, when to repot plants?
If you notice that your plant’s roots are coming out through the drainage holes, you should move it to a larger container as soon as possible.
Root-bound plants don’t have enough space to grow and stay healthy, and they will eventually die. So, that’s the main reason why you should be repotting plants into bigger pots.
Let’s find out how to repot your green friends and what else you need for this procedure!
The Tools You Need for Repotting
These are the basic things that you’ll need when repotting house plants:
- A larger pot
- The ideal soil mixture for your plant
- Gloves
- Goggles
- Gardening shears or scissors
- Gardening shovel (optional)
- Knife
- Coffee filter/Paper towel/Any other porous material
- Water
- Plant food (optional)
How to Choose the Ideal Container

If you want to change the container of your plant only because of the looks and design, the size of the planter should be the same.
If, however, you need to repot your plant because it has outgrown the current planter, the new one should be slightly wider and deeper. Let’s say around 1-2 inches.
Purchasing a planter that’s too large also isn’t the best solution because your plant will need more time to grow. The roots need to grow into the soil first, and then your plant can grow upwards.
Another downside of potting plants in a pot that’s too large is that it will contain more soil and therefore require more water. You risk accidentally underwatering your plant.
Your planter should have holes on the bottom or some other type of draining mechanism (lava rocks), to avoid drowning your plant.
Containers with holes and a tray enable you to prevent overwatering. Still have the water inside the tray so that the plant can draw it when needed.
If you travel a lot or simply forget to water your houseplants due to the hectic lifestyle, self-watering planters are the best and safest solution for your plants.
The self-watering pots can be adjusted to any plant’s needs, and they will release water accordingly.
The material of your plant’s new home is also very important for the watering frequency.
Some materials, such as terra cotta, are porous and are the ideal choice for gardeners that are afraid of overwatering. Materials like plastic and ceramics are less fragile.
The most popular materials for planters are plastic, ceramics, and terra cotta. Let’s give an overview of the pros and cons of each material so that you can make an informed decision.
| Plastic | Ceramics | Terra cotta | |
| Pros | -Affordable -It’s easy to add more drainage holes if needed -Great for plants that have delicate roots -Plastic pots come in a variety of colors | -Ceramics pots are available in a lot of different sizes, shapes, colors, and designs -Ideal for plants that prefer a lot of water | -Affordable -Usually very stylish -Perfect for plants that love porous materials because of the air circulation and water drainage |
| Cons | -Bad for the environment -Bad for plants that require airflow -Cheap appearance | -They rarely have drainage holes -There is no airflow | -Fragile -Bad for your furniture and other surfaces -Bad for plants that love water |
How to Select the Right Soil Mixture
Choosing the right, fresh soil for your plant’s new home is super important while potting plants. Sometimes, all your plant craves is a new soil mixture, without the need of a larger pot.
You can buy potting mixtures for any plant, but you have to do thorough research to know which nutrients and minerals to look for.
All-purpose soil can be an option for trees and durable plants, but more gentle plant families won’t benefit from it.
That’s why you should buy soil made for the plant in question or at least for a plant that has similar requirements when it comes to moisture, pH level, and nutrients.
Usually, the ideal mixture will consist of perlite that ensures enough airflow and good water drainage to prevent overwatering.
Very often, these soil mixtures will also be infused with a certain amount of fertilizer that can be beneficial for your plant.
So, if you notice that your plant isn’t thriving even though it still has more than enough room to grow, the soil might be the problem that’s stopping its healthy growth.
You can easily measure the quality of the soil regarding moisture and pH level by investing in a good quality soil meter.
This device will allow you to monitor all of the plants, not only freshly repotted ones.
Why Not Make Your Own Potting Mix? It’s Easy!
If you can’t find the soil that has all of the components that your plant needs, you can make your own mixture.
Have in mind, though, that you’ll have to do detailed research on measurements and percentage of each nutrient in order to make the potting mixture your plant(s) will love.
Horticulture stores should have everything you need to mix the ideal ratio for your plant.
A Detailed Guide to Repotting Your Plant
Now that you know which tools you need and what to take into consideration when choosing a container and potting mixture, let’s go to the next chapter on how to plant a plant in a pot. Here’s a step-by-step description of the easiest way of transplanting your indoor plants:
1. Water the plant

Add a significant amount of water into the old planter at least two days before repotting and let it drain.
The plant will slide out of the old planter more easily if the soil is moist, which will prevent damage.
2. Prepare your new planter

Thoroughly wash and dry the new pot. If you decide to go with a terra cotta planter, make sure to soak it before repotting to avoid the risk of your plant being dried out when the planter absorbs all the moisture.
3. Place the coffee filter or paper towel on the drainage holes

Sometimes, when placing plants into new containers, a little bit of soil might go through the drainage hole(s).
To avoid the mess, put a coffee filter or anything else that’s made from the similar, porous material over the holes.
That will stop the soil from falling out of the pot, yet it will be porous enough that the excess water will drain easily.
4. Add fresh soil to the new container

Add a layer of the new soil with the gardening shovel or hands. The best practice is to fill more than half of the new pot with the soil.
Then, you can place the old container inside the new one and gently press to leave an imprint.
This will make your job easier later when you need to place your plant inside the new container.
5. Take the plant out super gently
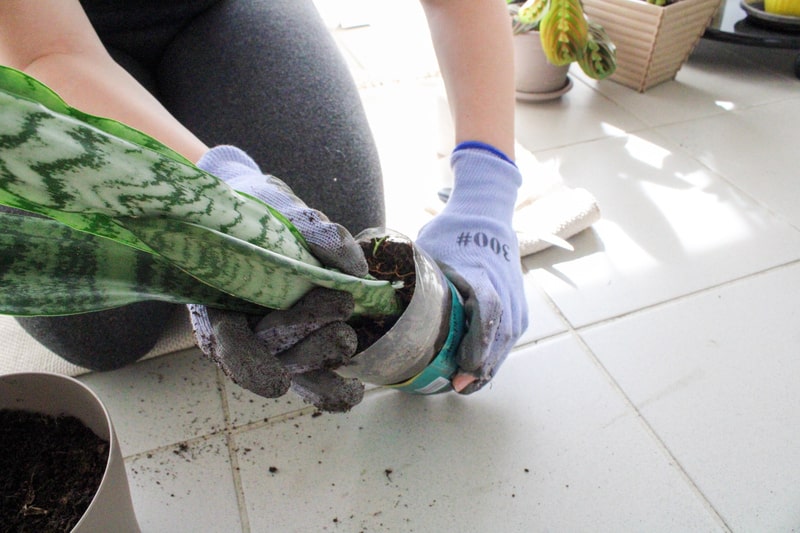
Hold the bottom of the plant firmly and gently wiggle while pulling it out of the container. If needed, use a sharp knife to separate the soil from the planter.
6. Take care of the roots


Remove the old soil from the roots as much as possible. You should also try to detangle them and prune with the gardening shears if necessary.
If you notice that the roots have started to rot, cut off the rotten part before placing the plant into the new container. Clean them with water to make sure everything is looking good.
7. Place the plant into its new home

Carefully put the plat in the imprint you made with the old container. It should be deep enough to cover the roots.
8. Add the rest of the soil

Hold the plant to keep it stable and add the rest of the potting mixture around it with the gardening shovel.
Push gently while adding the soil to make it compact and durable for the plant’s weight.
Don’t overfill the planter, though. The top of the soil should be at least one inch below the container’s rim.
9. Press the soil to eliminate air pockets

The next thing you want to do is press the soil as hard as you can. It will not only stabilize the plant, but also deal with all the air pockets that might cause roots problems.
Water will drain much better and it will save you some time later on fixing the problems that air pockets might cause.
10. Add a bit of fertilizer (if needed)
A lot of potting mixtures are already infused with suitable fertilizers that offer the ideal balance of nutrients for your plant’s growth.
If you used soil that was neutral (nutrient-wise) or an all-purpose potting mix, you’ll probably have to add plant food on the surface of the soil.
You can choose from liquid, powder, and granular form, depending on your preference.
Liquid fertilizers are usually easier to use because they’re already mixed with water.
Make sure to purchase a fertilizer made for your plant’s needs, and add water if you go with a powder or granular type so that the plant can consume nutrients better.
If you’re looking for a slow-releasing plant food that will be effective for a long time, granular plant food is the best option.
Follow the directions written on the packaging because there are a lot of different types of fertilizers, and you should use them in the right way and frequency.
11. Water thoroughly

Once your plant is secure and in its new home, you should water it well. This is important because it allows the plant to adjust to new soil and ensures enough moisture for an easier nutrient consumption.
12. Let it drain
Remove the pot tray and leave the container to drain the excess water. If you leave the plant in too much water, it will most likely drown even if it’s the kind that likes being frequently watered.
The roots of the plant shouldn’t “swim” and drown in excess water.
13. Find a place for the freshly repotted plant

As you probably know, each plant requires a different level of light exposure. If you already know which spot in your home works well for the plant you repotted, that’s great.
Still, if you received the plant as a gift right before repotting it, or if you notice that something wasn’t right with the plant before (dry leaves, green instead of white flowers, etc.), do better research on the plant’s light needs and find a new place for it.
That’s pretty much all you need to know about how to pot plant.
When Is the Best Time to Repot My Plants?
As said, the first red flag should be noticing that the roots have started to come out through the drainage holes. You might even notice the roots on or above the surface of the soil.
Once the current planter becomes too small, roots try to find space for growing. That’s when they are exposed and at risk of being constantly in water (in the pot tray). That will cause rotting, and your plant’s health will be compromised.
So, as soon as you notice that, you should consider repotting.
Another good indicator that you should purchase a bigger planter is if you notice that your plant isn’t thriving or growing fast like before, even though you’re caring for it in the same way.
The most obvious sign is your plant becoming too heavy for its current planter and leaning on one side or even falling. That’s one of the signals to repot plant.
As for the right season to change your plant’s container, almost all of the gardeners agree that you should place your plant into its new home before the growing season.
For the majority of plants, that means that the repotting should be done at the beginning of spring before your plant starts blooming.
Even though a lot of houseplants are durable and will be fine even if you change the container in the middle of summer, the best practice is to do it in March or April. That is if you don’t want to risk losing flowers or compromising the plant’s overall health.
How Often to Repot Plants?
The time between replanting plants usually depends on the plant in question or the plant family’s characteristics.
Fast growers will probably need a more frequent repotting (once or twice a year), while some plants (usually the older ones) can stay in the same container for years.
The majority of plants, however, usually need transplanting every two years.
Still, you might want to change the soil of the plants that grow slower and don’t need a larger planter, so that they have enough nutrients to stay healthy.
Also, super large plants that are nearly impossible to repot will benefit from “topdressing.”
This method requires you to remove at least a couple of inches of the old soil (until you notice the roots) and replace it with a fresh mix.
If you’re thinking about moving your plant into a much larger container right away and forgetting to repot it for a long time, that isn’t the best solution for your plant’s growth.
First and foremost, more soil means more water. You could risk underwatering your houseplant because a good amount of water could end up not being consumed by the plant thanks to the soil.
The second reason is that your plant’s roots will need more time to grow into the soil before the plant itself could start growing in height.
So, don’t be lazy, and try to monitor your plant’s growth to be able to tell when it’s time to place it into a new container.
Do I Have To Add Plant Food When Repotting?
Many store-bought soil mixtures are infused with suitable fertilizers. If you want to make potting mixture on your own, you can add a bit of slow-releasing plant food in it.
On the other hand, if you choose to buy a fertilizer-free soil mixture, you should add the plant food on top of the soil once you finish repotting.
Since the repotting should be done in the same season as fertilizing, it’s an ideal opportunity to treat your plant to the highly-needed nutrients.
Some repot plants will need time before they get used to the new soil. That’s when you should wait for at least one month before adding plant food.
Do research about the plant you want to repot and fertilize accordingly—not all plants have the same requirements.
What to Keep in Mind When Repotting
- Add an extra layer—If you’re worried about overwatering your plant, you can include one layer of rocks such as gravel or lava rock on the bottom of the container, before adding soil.
This will provide additional drainage and make sure that your plant doesn’t drown.
You can also use this trick if your planter doesn’t have enough drainage holes.
- It can get messy!—Repotting a plant is a dirty job. That’s why you should wear gardening gloves and protect the surface around your repotting station.
Transplanting outdoors or on the balcony would be ideal, but not everyone has that privilege.
You can place a newspaper or plastic wrap around the planters. That will catch the excess soil and make the cleaning process faster.
- Be gentle—Plants are usually super sensitive and require gentle handling, especially around the roots.
Even if you have to prune the roots and detangle them, be super careful and do it slowly and with patience.
If you’re too rough, you’ll damage the root system, and your plant will surely suffer.
- Be mindful of toxic plants—Wearing gardening gloves is always recommended, but you should especially wear them if the plant you need to repot has toxic sap.
In that case, you should also wear safety goggles and avoid touching your face afterward.
- Invest in an air humidifier—If you’re not sure about the watering schedule after repotting, you can keep an air humidifier next to the plant and have it draw moisture from the air as well as the soil.
Conclusion
Hopefully, this article helped you learn when to repot a plant, and how to pot indoor plants.
As you can see, potting a plant isn’t a rocket science.
Now that you know how to pot a plant and make sure the whole procedure goes smoothly, things will be less stressful. Not only for you, but for your dear green friend as well.
Have you got any cool tip for me on how to repot a houseplant?
Hit the comments section below, I’d like to hear from you!
